Lumbar Total Dorsal Ramus Injection
| Lumbar Total Dorsal Ramus Injection | |
|---|---|
| Indication | Low back pain of facet joint or myofascial origin. |
| Syringe | 5-10mL |
| Needle | 21-gauge, 80mm or other |
| Steroid | no published use |
| Local | studies used mepivacaine 1% |
| Volume | 5mL |
This is a procedure used to both all three branches of one or more dorsal rami, by injecting large volumes of local anaesthetic in the conventional area of the medial branch block.[1] This can be done under ultrasound guidance and so is more readily accessible than the preferred fluoroscopically guided medial branch block, and has there is no radiation exposure. The analgesic effect lasts about one week.[2] Theoretically all pain arising from the facet joint, musculature, or both should be blocked.[1]. By using CT (Miyakoshi et al), and fluoroscopy (Kimura et al), the two published studies on the procedure confirmed correct injectate placement, showing spread to the cranial dorsal root, and spread to the intermediate and lateral branches.[1][2]
See Kimura et al for a free open access article on the technique.[2]
Anatomy
The lumbar dorsal rami have three branches. The medial branch innervates the multifidus muscle and the facet joint at the same level and the level above. The intermediate branch innervates the longissimus muscles. The lateral branch innervates the iliocastalis muscle.
![Branches of the lumbar dorsal rami at the levels of L4 and L5. mb, medial branch; ib, intermediate branch; lb, lateral branch; ab, articular branch; ITL, intertransverse ligament. *A target point of total dorsal ramus block. 2007 Elsevier Masson SAS. All rights reserved.[1]](/w/img_auth.php/9/95/Dorsal_rami_branches.PNG)
Branches of the lumbar dorsal rami at the levels of L4 and L5. mb, medial branch; ib, intermediate branch; lb, lateral branch; ab, articular branch; ITL, intertransverse ligament. *A target point of total dorsal ramus block.
2007 Elsevier Masson SAS. All rights reserved.[1]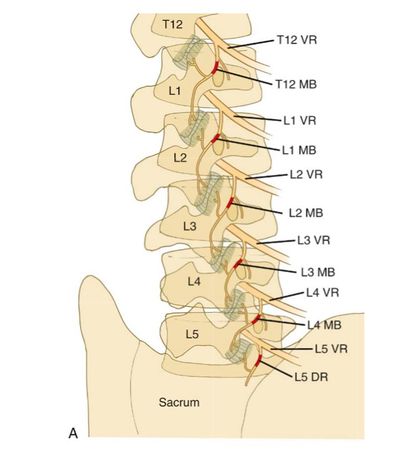
Oblique View, intermediate and lateral branches not shown.
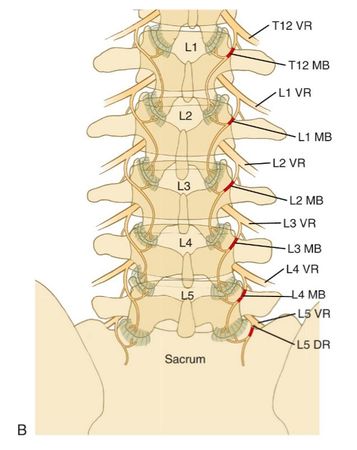
AP View, intermediate and lateral branches not shown.
![Branches of the lumbar dorsal rami at the levels of L4 and L5. mb, medial branch; ib, intermediate branch; lb, lateral branch; ab, articular branch; ITL, intertransverse ligament. *A target point of total dorsal ramus block. 2007 Elsevier Masson SAS. All rights reserved.[1]](/wiki/File:Dorsal_rami_branches.PNG)


Indications
Contraindications
Pre-procedural Evaluation
Equipment
Technique
The two studies on the procedure both targeted the L4/5 facet joints (and associated musculature), by injecting at the bilateral L5 levels only, thereby blocking the L4 dorsal rami, as well as the L3 dorsal rami due to cranial spread. For the L4/5 facet joint and musculature, the target point is the L5 level, and the injectate should spread to the descending medial branch of the level above.
Ultrasound Guided
![Transverse image, at the fifth lumbar vertebral level. The arrow indicates needle placement.[2]](/w/img_auth.php/1/13/TDR_ultrasound.PNG)
Transverse image, at the fifth lumbar vertebral level. The arrow indicates needle placement.[2]
![Probe position. The arrow indicates the position of the needle.[2]](/w/img_auth.php/thumb/c/ca/TDR_ultrasound2.PNG/240px-TDR_ultrasound2.PNG)
Probe position. The arrow indicates the position of the needle.[2]
![Transverse image, at the fifth lumbar vertebral level. The arrow indicates needle placement.[2]](/wiki/File:TDR_ultrasound.PNG)
![Probe position. The arrow indicates the position of the needle.[2]](/wiki/File:TDR_ultrasound2.PNG)
- Position: prone, with pillow under abdomen to decrease lordosis
- Place convex ultrasound probe at the approximate fifth lumbar level
- Identify the spinous, superior articular, and transverse processes
- the target point is the junction of the vertebral superior articular process and the transverse process
- Aspirate to evaluate for vessel placement, then inject 5mL of local anaesthetic on one or both sides
- During injection maintain cranial rotation of the needle bevel to maximise cranial spread of the injectate.
- Evaluate for pain at rest and during motion in maximum flexion and extension both before and 30 minutes after the block. A full pain diary can be completed.
Fluoroscopy Guided
If there is fluoroscopic access then one should perform a standard medial branch block.
Landmark Guided
Complications
Aftercare
Evaluation with pain diary.
Videos
Video showing medial branch block, the procedure for total dorsal ramus block is the same except with higher volume and cranial needle rotation.
See Also
External Links
References
- ↑ 1.0 1.1 1.2 1.3 Miyakoshi et al.. Total dorsal ramus block for the treatment of chronic low back pain: a preliminary study. Joint bone spine 2007. 74:270-4. PMID: 17383923. DOI.
- ↑ 2.0 2.1 2.2 2.3 2.4 Kimura et al. Ultrasound-guided total dorsal ramus block for the treatment of chronic low back pain. Journal of Orthopaedics, Trauma and Rehabilitation. June 2020. DOI
Literature Review
 Literature Review
- Reviews from the last 7 years: review articles, free review articles, systematic reviews, meta-analyses, NCBI Bookshelf
- Articles from all years: PubMed search, Google Scholar search.
- TRIP Database: clinical publications about evidence-based medicine.
- Other Wikis: Radiopaedia, Wikipedia Search, Wikipedia I Feel Lucky, Orthobullets,