Help:Tables: Difference between revisions
No edit summary |
No edit summary |
||
| Line 1: | Line 1: | ||
==How to insert a table== | |||
===Edit source=== | |||
The wikitext language has some marks provided to create tables. Row and column tables with text or data can be incorporated into the wiki. | |||
To insert a table you can click the 'Table' button on the edit toolbar that appears when you click edit on a page.[[File:EditToolbar2.png|center|frameless|border|400px|link=Special:FilePath/EditToolbar2.png]]This is the initial text (code) by default: | |||
{| class="wikitable" | |||
!code | |||
!result | |||
|- | |||
|<pre> | |||
{| class="wikitable" | |||
!header 1 | |||
!header 2 | |||
!header 3 | |||
|- | |||
|row 1, cell 1 | |||
|row 1, cell 2 | |||
|row 1, cell 3 | |||
|- | |||
|row 2, cell 1 | |||
|row 2, cell 2 | |||
|row 2, cell 3 | |||
|} | |||
</pre> | |||
| | |||
{| class="wikitable" | |||
!header 1 | |||
!header 2 | |||
!header 3 | |||
|- | |||
|row 1, cell 1 | |||
|row 1, cell 2 | |||
|row 1, cell 3 | |||
|- | |||
|row 2, cell 1 | |||
|row 2, cell 2 | |||
|row 2, cell 3 | |||
|} | |||
|} | |||
===Visual editor=== | |||
====Editing existing tables==== | |||
This is a guide on how to create or edit tables using the visual editor. | |||
1) To edit an existing table, simply double click on a cell. | |||
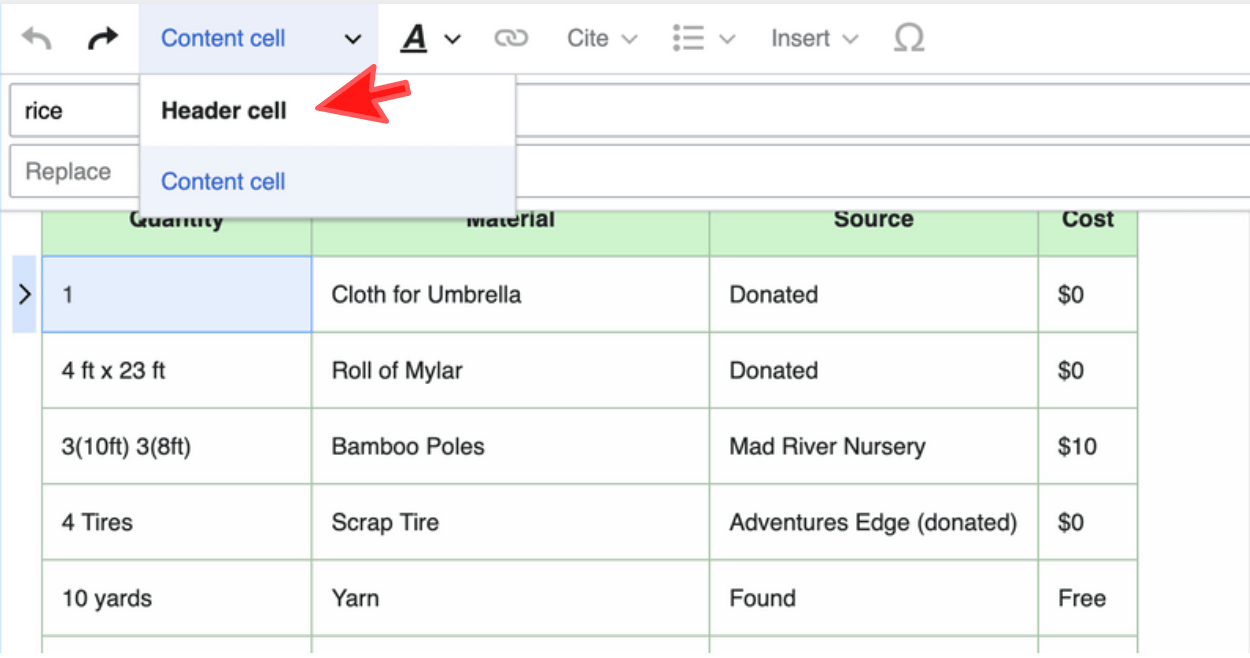
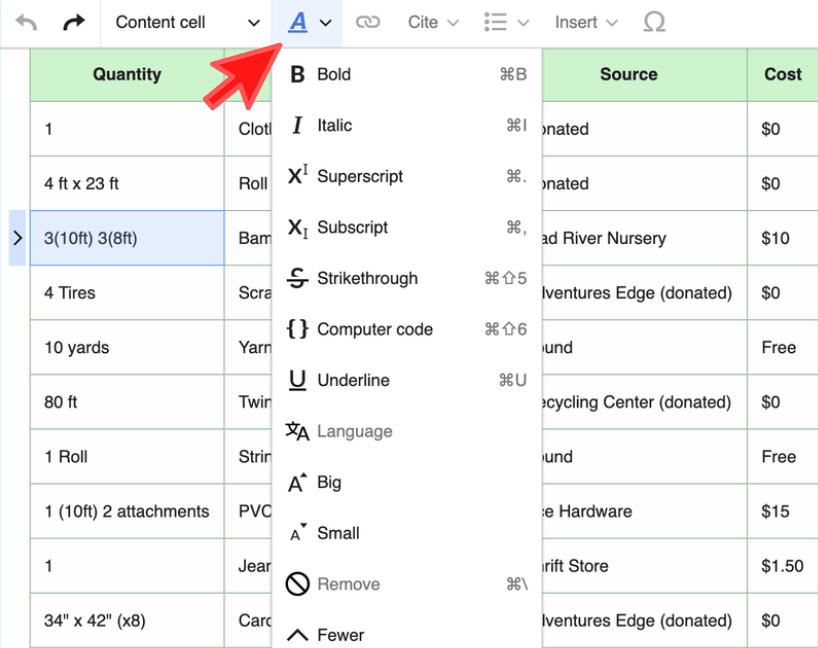
2) If you want to format a cell, just click once to select it. You also have the option to designate it as a 'Header cell' by clicking <code>Content cell</code>[[File:TablesVisualEditor.png|center|frameless|border|500px|link=Special:FilePath/TablesVisualEditor.png]]3) You can also give any type of format to the text by clicking on the following:[[File:TablesVisualEditor2.png|center|frameless|border|400px|link=Special:FilePath/TablesVisualEditor2.png]]4) To merge cells, simply select the ones you want to merge and the dialog box will appear. Click on <code>Merge</code>.[[File:TablesVisualEditor3.png|center|frameless|border|400px|link=Special:FilePath/TablesVisualEditor3.png]] | |||
====Adding tables==== | |||
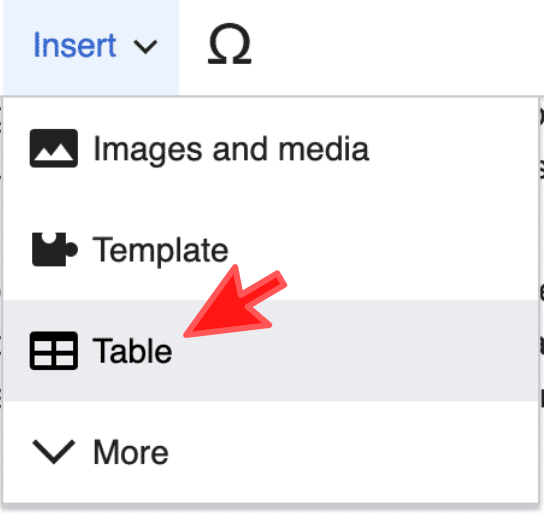
1) To add a table, go to the toolbar, click on <code>Insert</code> and then "Tables".[[File:TablesVisualEditor4.png|center|frameless|border|200px|link=Special:FilePath/TablesVisualEditor4.png]]After selecting how many columns and rows you want, it will be inserted in the place you have chosen. Now you can proceed to add text. | |||
2) If you want to insert, move, delete a column or row, you just have to select a cell, and an arrow will immediately appear at the top (for columns), or on the left side (for rows).[[File:TablesVisualEditor5.png|center|frameless|border|300px|link=Special:FilePath/TablesVisualEditor5.png]] | |||
==Converting a spreadsheet to a wiki table== | |||
[http://tools.wmflabs.org/excel2wiki/ Excel2Wiki] is a tool that helps you convert a Gnumeric, MS Excel, or OpenOffice.org Calc spreadsheet to a wiki table. | |||
==Format options== | |||
For basic formatting, with lines and light shading, use: class="wikitable" | |||
Style commands: | |||
*To align the table and allow text to wrap, use "float:right" or "float:left" | |||
*Headers: start these rows with exclamation marks (!) | |||
*To make space between the table and surrounding text or objects, use margin, e.g <code>margin:.5em;</code> (inside the ''style="..."'' term) | |||
*Spacing between border and contents: use cellpadding. For some reason it doesn't seem to work inside the ''style="..."'' term, so use it in this form: <code>cellpadding="10"</code> | |||
Applying wikitable, float right and margin in a simple table looks like this:<pre> | |||
{| class="wikitable" style="float:right; margin:.5em" | |||
!Header column 1 | |||
!Header column 2 | |||
|- | |||
|cell 1 | |||
|cell 2 | |||
|} | |||
</pre>Which displays like this (note that the following text wraps around the table): | |||
{| class="wikitable" style="float:right; margin:.5em" | |||
!Header column 1 | |||
!Header column 2 | |||
|- | |||
|cell 1 | |||
|cell 2 | |||
|}Dummy text... Lorem ipsum dolor sit amet, consectetur adipiscing elit. Mauris interdum augue ut dui lobortis vitae pellentesque sem ornare. Proin sodales lectus nec erat semper hendrerit. Aenean pulvinar quam eu purus vehicula euismod. Etiam et magna leo. Vivamus eu metus vel leo sodales sollicitudin. Curabitur porttitor rutrum quam ac gravida. In eget tristique nisi. Pellentesque nulla sapien, pulvinar ultricies egestas sit amet, porttitor non leo. | |||
{{Break clear}} | |||
For more formatting options, see [[Help:Notices]]. | |||
==Video demonstrations== | |||
{{Grid | |||
|content= | |||
{{Video | |||
|video=ZYpJjd_tiVA | |||
|title=How to insert a table (Visual Edit) | |||
|description=Tutorial on how to create a table (Visual edit) in Appropedia. | |||
|language=EN | |||
|annotations= | |||
}} | |||
{{Video | |||
|video=_th_-7jAbeE | |||
|title=Cómo insertar una tabla (Visual Edit) | |||
|description=Tutorial sobre cómo crear una tabla (Visual edit) en Appropedia. | |||
|language=ES | |||
|annotations= | |||
}} | |||
}} | |||
==Sortable table== | |||
Sortable tables can be created by using class="wikitable sortable". As shown in the following example:<pre> | |||
{| class="wikitable sortable" | |||
!Run # | |||
!Temperature (°F) | |||
!Humidity (%) | |||
|- | |||
|1 | |||
|78 | |||
|42 | |||
|- | |||
|2 | |||
|76 | |||
|55 | |||
|- | |||
|3 | |||
|74 | |||
|41 | |||
|} | |||
</pre><center>that creates (notice the sort buttons next to the headings)</center> | |||
{| class="wikitable sortable" | |||
!Run # | |||
|Temperature (°F) | |||
|Humidity (%) | |||
|- | |||
|1 | |||
|78 | |||
|42 | |||
|- | |||
|2 | |||
|76 | |||
|55 | |||
|- | |||
|3 | |||
|74 | |||
|41 | |||
|}See [http://Sorting https://meta.wikimedia.org/wiki/Help:Table#Sorting] for more information. | |||
==Collapsing tables== | |||
See [[wikipedia:Help:Collapsing|Wikipedia:Help:Collapsing]] for help with collapsing. | |||
==Examples== | |||
See [[Help:Table Examples]] | |||
==See also== | |||
*[[Help:Table examples|Help:Table Examples]] | |||
*[[mw:Help:Tables]] on mediawiki.org - quite detailed | |||
*[[wikipedia:Wikipedia:Manual_of_Style/Tables|Wikipedia:Manual_of_Style/Tables]] | |||
*[https://www.tablesgenerator.com/mediawiki_tables# Useful tool for generating tables] | |||
[[Category:Help]] | [[Category:Help]] | ||
Revision as of 19:08, 21 March 2022
How to insert a table
Edit source
The wikitext language has some marks provided to create tables. Row and column tables with text or data can be incorporated into the wiki.
To insert a table you can click the 'Table' button on the edit toolbar that appears when you click edit on a page.
This is the initial text (code) by default:
| code | result | |||||||||
|---|---|---|---|---|---|---|---|---|---|---|
{| class="wikitable"
!header 1
!header 2
!header 3
|-
|row 1, cell 1
|row 1, cell 2
|row 1, cell 3
|-
|row 2, cell 1
|row 2, cell 2
|row 2, cell 3
|}
|
|
Visual editor
Editing existing tables
This is a guide on how to create or edit tables using the visual editor.
1) To edit an existing table, simply double click on a cell.
2) If you want to format a cell, just click once to select it. You also have the option to designate it as a 'Header cell' by clicking Content cell
3) You can also give any type of format to the text by clicking on the following:
4) To merge cells, simply select the ones you want to merge and the dialog box will appear. Click on Merge.

Adding tables
1) To add a table, go to the toolbar, click on Insert and then "Tables".
After selecting how many columns and rows you want, it will be inserted in the place you have chosen. Now you can proceed to add text. 2) If you want to insert, move, delete a column or row, you just have to select a cell, and an arrow will immediately appear at the top (for columns), or on the left side (for rows).

Converting a spreadsheet to a wiki table
Excel2Wiki is a tool that helps you convert a Gnumeric, MS Excel, or OpenOffice.org Calc spreadsheet to a wiki table.
Format options
For basic formatting, with lines and light shading, use: class="wikitable"
Style commands:
- To align the table and allow text to wrap, use "float:right" or "float:left"
- Headers: start these rows with exclamation marks (!)
- To make space between the table and surrounding text or objects, use margin, e.g
margin:.5em;(inside the style="..." term) - Spacing between border and contents: use cellpadding. For some reason it doesn't seem to work inside the style="..." term, so use it in this form:
cellpadding="10"
Applying wikitable, float right and margin in a simple table looks like this:
{| class="wikitable" style="float:right; margin:.5em"
!Header column 1
!Header column 2
|-
|cell 1
|cell 2
|}
Which displays like this (note that the following text wraps around the table):
| Header column 1 | Header column 2 |
|---|---|
| cell 1 | cell 2 |
Dummy text... Lorem ipsum dolor sit amet, consectetur adipiscing elit. Mauris interdum augue ut dui lobortis vitae pellentesque sem ornare. Proin sodales lectus nec erat semper hendrerit. Aenean pulvinar quam eu purus vehicula euismod. Etiam et magna leo. Vivamus eu metus vel leo sodales sollicitudin. Curabitur porttitor rutrum quam ac gravida. In eget tristique nisi. Pellentesque nulla sapien, pulvinar ultricies egestas sit amet, porttitor non leo.
For more formatting options, see Help:Notices.
Video demonstrations
Sortable table
Sortable tables can be created by using class="wikitable sortable". As shown in the following example:
{| class="wikitable sortable"
!Run #
!Temperature (°F)
!Humidity (%)
|-
|1
|78
|42
|-
|2
|76
|55
|-
|3
|74
|41
|}
| Run # | Temperature (°F) | Humidity (%) |
|---|---|---|
| 1 | 78 | 42 |
| 2 | 76 | 55 |
| 3 | 74 | 41 |
See https://meta.wikimedia.org/wiki/Help:Table#Sorting for more information.
Collapsing tables
See Wikipedia:Help:Collapsing for help with collapsing.
Examples
See also
- Help:Table Examples
- mw:Help:Tables on mediawiki.org - quite detailed
- Wikipedia:Manual_of_Style/Tables
- Useful tool for generating tables