Uncategorised files
From WikiMSK
Showing below up to 500 results in range #501 to #1,000.
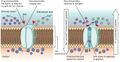 Ligand-gated-channels.jpg 1,176 × 611; 177 KB
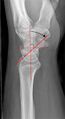
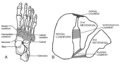 Lisfranc joint.png 1,168 × 614; 256 KB
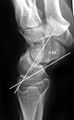
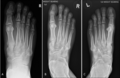 Lisfranc xray.PNG 589 × 385; 251 KB
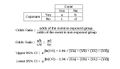
 Local anaesthetic structure.png 585 × 404; 36 KB
 Low Back Pain - Knezevic 2021.pdf ; 667 KB
- Low back pain PROMs.pdf ; 1.16 MB
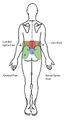
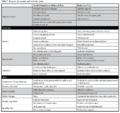 Low back pain somatic and radicular features.PNG 793 × 748; 141 KB
 Low back pain taxonomy.jpg 826 × 1,529; 120 KB
 Lowback.png 128 × 128; 7 KB
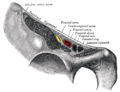
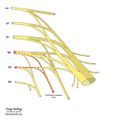
 Lumbar-Plexus-Anatomy-1.jpg 600 × 526; 101 KB
 Lumbar-medial-branch-nerve-blocks.jpg 717 × 806; 55 KB
 Lumbar-medial-branch-nerve-blocks2.jpg 637 × 803; 61 KB
 Lumbar-neuroforaminal-stenosis-normal.jpg 686 × 686; 52 KB
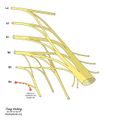
 Lumbar-plexus-and-its-branches.png 508 × 600; 95 KB
 Lumbar Facet pain.PNG 783 × 613; 441 KB
 Lumbar interspinous oedema hierarchy.png 1,006 × 330; 12 KB
 Lumbar mamillo-accessory ligament.png 467 × 253; 98 KB
 Lumbar mamillo-accessory ligament posterior view.png 352 × 266; 203 KB
 Lumbar medial branches.png 524 × 682; 248 KB
 Lumbosacral trunk.jpeg 630 × 630; 49 KB
 MBB Left L3 and L4.jpg 1,162 × 1,162; 139 KB
 MBB Left L3 and L4 AP contrast.jpg 1,162 × 1,162; 115 KB
 MBB Left L3 and L4 Decline.jpg 1,162 × 1,162; 144 KB
 MBB Left L3 and L4 Oblique.jpg 1,162 × 1,162; 141 KB
 MBB facet joint.png 403 × 397; 31 KB
 MRI T2 Lumbar Spine L1-L2 Transarticular Axial.jpg 990 × 900; 134 KB
 MRI T2 Lumbar Spine L1 Subpedicular Axial.jpg 990 × 900; 133 KB
 MRI T2 Lumbar Spine L1 Transpedicular Axial.jpg 990 × 900; 131 KB
 MRI T2 Lumbar Spine L2-L3 Transarticular Axial.jpg 990 × 900; 140 KB
 MRI T2 Lumbar Spine L2 Subpedicular Axial.jpg 990 × 900; 141 KB
 MRI T2 Lumbar Spine L2 Transpedicular Axial.jpg 990 × 900; 139 KB
 MRI T2 Lumbar Spine L3-L4 Transarticular Axial.jpg 990 × 900; 147 KB
 MRI T2 Lumbar Spine L3 Subpedicular Axial.jpg 990 × 900; 145 KB
 MRI T2 Lumbar Spine L3 Transpedicular Axial.jpg 990 × 900; 142 KB
 MRI T2 Lumbar Spine L4-L5 Transarticular Axial.jpg 990 × 900; 146 KB
 MRI T2 Lumbar Spine L4 Subpedicular Axial.jpg 990 × 900; 149 KB
 MRI T2 Lumbar Spine L4 Transpedicular Axial.jpg 990 × 900; 149 KB
 MRI T2 Lumbar Spine L5-S1 Transarticular Axial.jpg 990 × 900; 150 KB
 MRI T2 Lumbar Spine L5 Subpedicular Axial.jpg 990 × 900; 152 KB
 MRI T2 Lumbar Spine L5 Transpedicular Axial.jpg 990 × 900; 150 KB
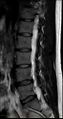
 MRI T2 Lumbar Spine Sagittal Median.jpg 524 × 994; 116 KB
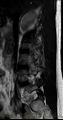
 MRI T2 Lumbar Spine Sagittal Paramedian.jpg 526 × 994; 109 KB
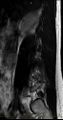 MRI T2 Lumbar Spine Sagittal Peripheral.jpg 522 × 994; 100 KB
 MRI T2 Lumbar Spine Sagittal Tangential.jpg 522 × 994; 104 KB
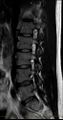 MRI T2 Lumbar Spine Sagittal Transpedicular.jpg 524 × 994; 106 KB
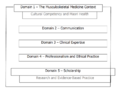 MSK Domains.png 859 × 643; 76 KB
- Managing DICOM - Varma 2012.pdf ; 2.69 MB
- Marchand S clinical placebo.pdf ; 117 KB
- Mcdonald2012 neuromuscular disorders.pdf ; 1.32 MB
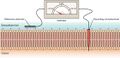 Measuring charge across membrane.jpg 1,119 × 541; 130 KB
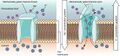 Mechanically-gated-channels.jpg 1,100 × 512; 146 KB
 Medial branch ppr.jpg 228 × 246; 11 KB
 Medial branch ppr lateral view.jpg 234 × 318; 17 KB
 Medial branch ppr posterior view.jpg 289 × 372; 20 KB
 Medial calcaneal tubercle tenderness.jpg 460 × 307; 17 KB
 Medial hamstring reflex.PNG 502 × 369; 290 KB
 Median nerve NCS CMAP.png 291 × 303; 144 KB
- Median nerve block.mp4 ; 1.18 MB
 Median nerve position variations wrist.png 425 × 430; 96 KB
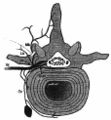
 Median sagittal section lumbar vertebrae and ligaments Gray.png 492 × 409; 63 KB
 Medianblock.jpg 262 × 649; 64 KB
- Medical History.pdf ; 30 KB
 Medicine.png 128 × 128; 5 KB
 Medulla spinali ubstantia grisea.png 1,280 × 940; 126 KB
- Mellor2018 - Leap Trial.pdf ; 455 KB
 Membrane Potential.png 953 × 737; 41 KB
 Miscellaneous.png 128 × 128; 3 KB
 Morgagni Robert Thom art.jpeg 962 × 734; 229 KB
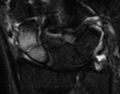
 Mri lisfranc.PNG 592 × 220; 104 KB
 Multifidus fat infiltration.png 671 × 307; 191 KB
 Muscle Energy Pelvis Posterior Rotation.jpg 692 × 922; 249 KB
- Muscle biopsy - Cotta 2021.pdf ; 14.2 MB
 Musculoskeletal science practice.jpg 288 × 384; 41 KB
- Myotendinous Junct.pdf ; 1.38 MB
- NZAMM-Curriculum-FINAL-2019.pdf ; 951 KB
- NZAMM-Training-Manual-190118.pdf ; 628 KB
 NZAMM DISQ 16-01-18.xlsx ; 12 KB
- NZAMM Hip Exam 16-8-19.xlsx ; 179 KB
- NZAMM Knee Physical Examination.xlsx ; 176 KB
- NZAMM Pelvic Exam 15-01-18.xlsx ; 179 KB
- NZCMM Training Manual Oct 2021.pdf ; 514 KB
 Neck.png 128 × 128; 4 KB
 Neck tongue syndrome anatomy.jpg 748 × 1,037; 203 KB
 Nerve.png 128 × 128; 7 KB
 Nerve Cells.jpeg 507 × 545; 53 KB
- Nerve Structure and Function 2011.pdf ; 2.67 MB
 Nerve root anomalies.png 816 × 233; 102 KB
 Nerve roots relationship.jpg 883 × 450; 57 KB
 Nerve to obturator internus and superior gemellus.jpeg 630 × 630; 56 KB
 Nerve to piriformis.jpeg 630 × 630; 55 KB
 Nerve to quadratus.jpeg 630 × 630; 56 KB
- Nerves - Wilby 2021.pdf ; 549 KB
 Nerves of the left upper extremity.gif 471 × 899; 166 KB
 Nerves to perineum and levator ani.jpeg 630 × 630; 53 KB
 Nervus-femoralis.png 500 × 385; 52 KB
 Nitta lumbar dermatomes.png 826 × 1,127; 183 KB
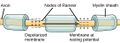 Nodes of Ranvier.jpg 544 × 194; 78 KB
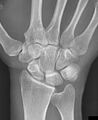 Normal wrist xray.jpeg 254 × 311; 22 KB
 Nzamm-logo.png 274 × 109; 20 KB
 Nzamm.png 113 × 109; 14 KB
- OCD Knee - Zanon 2014.pdf ; 431 KB
 Obturator nerve.jpeg 630 × 630; 52 KB
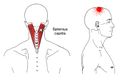
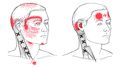
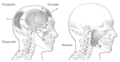
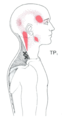
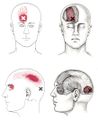 Occipitalis, Frontalis Trigger Points.jpg 869 × 1,060; 146 KB
 Occult scaphoid fracture MRI.jpg 300 × 236; 8 KB
 OddsRatio and ConfidenceInterval.jpg 675 × 387; 40 KB
 One-note.png 128 × 128; 4 KB
 Online-class.png 256 × 256; 6 KB
 Open Access logo PLoS white.svg 640 × 1,000; 1 KB
 Opioid discontinuation mcpherson 2018.png 699 × 543; 76 KB
 Opioid discontinuation mcpherson overall 2018.png 709 × 474; 40 KB
 Ottawa ankle rules.jpg 1,280 × 968; 174 KB
- PEO Disease Impact - Smits 2011.pdf ; 238 KB
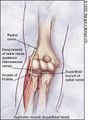 PIN.jpg 260 × 354; 39 KB
 PM&R.jpeg 298 × 399; 33 KB
- PROMs - greenhalgh 2018.pdf ; 1.62 MB
 PRP Processing station.jpg 692 × 922; 173 KB
- Paediatric MSK Examination.docx ; 22 KB
 Paediatrics.png 128 × 128; 11 KB
 Pain.png 128 × 128; 9 KB
- Pain Terms.pdf ; 54 KB
- Pain diagram.pdf ; 112 KB
 Pain journal.jpg 480 × 644; 66 KB
 Pain maps C0 - C3.png 1,030 × 873; 68 KB
 Pain medicine journal.jpeg 520 × 690; 61 KB
 Pain physician journal.jpg 199 × 254; 6 KB
 Pain practice journal .jpg 480 × 631; 42 KB
 Paracetamol structure.png 1,920 × 1,031; 41 KB
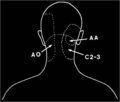
 Paraspinous cervical block.jpg 750 × 791; 271 KB
- Part III-PainTerms IASP Taxonomy.pdf ; 133 KB
 Patellar Tracking.PNG 253 × 149; 12 KB
 Pdf.png 30 × 37; 2 KB
 Pelvic Xray Anatomy.PNG 596 × 527; 521 KB
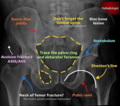 Pelvic Xray Review Areas.PNG 598 × 529; 515 KB
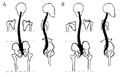 Pelvic malalignment.png 583 × 374; 85 KB
 Perforating cuteanous nerve.jpeg 630 × 630; 54 KB
 Peroneal tendon sheath injection ultrasound.PNG 468 × 240; 108 KB
- Phantom limb pain - Floor 2006.pdf ; 513 KB
- Physio NZ CRPS.pdf ; 459 KB
- Physiol deep somatic pain.pdf ; 387 KB
 Physiology.png 128 × 128; 9 KB
 Picture 5.png 246 × 381; 149 KB
 Pills icon.png 66 × 66; 4 KB
 Pmc logo.png 38 × 20; 2 KB
- Polymyalgia Rheumatica - BPAC.pdf ; 560 KB
 Popliteus muscle.png 600 × 600; 143 KB
 Posterior Hip Muscles.png 360 × 437; 17 KB
 Posterior Hip Muscles 2.png 297 × 424; 37 KB
 Posterior femoral cutaneous nerve.jpeg 630 × 630; 55 KB
 Posterior sacroiliac joint.png 559 × 700; 95 KB
 Ppt.png 128 × 128; 1 KB
- Practical Neurology - Dizziness.pdf ; 508 KB
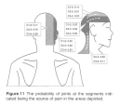 Probability 1.jpg 1,030 × 915; 129 KB
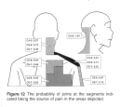 Probability 2.jpg 1,030 × 915; 140 KB
- Probability C1-C4.tif 504 × 461; 930 KB
- Probability C4-C7.tif 518 × 458; 964 KB
 Procedures.png 256 × 256; 6 KB
 Protrusio acetabuli xray.jpg 457 × 587; 26 KB
 Proximal carpal row disruption xray.jpeg 388 × 500; 30 KB
 Publicdomain.png 403 × 142; 6 KB
- Published paper jan 2020 A Toor.pdf ; 1.77 MB
 Pubmed-logo-named.png 22 × 22; 1 KB
 Pubmed-logo.png 22 × 22; 1 KB
 Pubmed.png 16 × 16; 521 bytes
 Pudendal nerve.jpeg 630 × 630; 53 KB
 Quadriga.png 360 × 353; 87 KB
 Quiz.png 22 × 22; 414 bytes
 Quiz0.png 22 × 22; 352 bytes
 Quiz2.png 22 × 22; 401 bytes
 Quiz9 picture a.png 200 × 210; 37 KB
 Quiz9 picture b.png 601 × 264; 119 KB
 Quiz9 picture c.png 292 × 548; 163 KB
 Quiz9 picture d.png 228 × 194; 57 KB
- ROTATOR CUFF INTERVAL.pdf ; 1.51 MB
 Radial nerve NCS SNAP.png 288 × 321; 135 KB
 Radial nerve SNAP.png 288 × 321; 135 KB
 Radiofrequency lumbar medial branch.jpeg 1,878 × 1,508; 537 KB
 Radiology.png 128 × 128; 6 KB
 Reading man.jpg 2,048 × 1,280; 130 KB
 Reading manikin.jpg 2,000 × 1,278; 134 KB
 Rectus abdominis.jpg 510 × 510; 42 KB
 Red-flag.png 32 × 32; 799 bytes
 Red-flag2.png 32 × 32; 523 bytes
 Region selector.jpg 1,029 × 2,059; 99 KB
 Region selector.png 310 × 599; 63 KB
 Regions.png 256 × 256; 20 KB
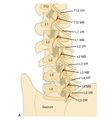
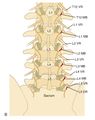
 Relation of spinal roots to vertebra.jpg 638 × 826; 123 KB
 Research.png 128 × 128; 11 KB
 Reuse.png 22 × 22; 476 bytes
 Right C6-7 disc protrusion MRI axial.jpg 667 × 622; 62 KB
- Rio2013.pdf ; 395 KB
 Rocabado.png 898 × 724; 202 KB
- Rotator cuff cable.PDF ; 541 KB
- Rotator cuff interval 2017.pdf ; 1.44 MB
- Rotator cuff tears 2012.pdf ; 73 KB
- Rotator cuff tears approach.pdf ; 1.5 MB
- Rotator cuff tears update.pdf ; 1.03 MB
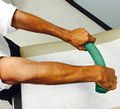 Rubber bar lateral elbow.jpg 292 × 266; 48 KB
- S1 TFI anatomy - Tiegs-Heiden 2023.pdf ; 3.86 MB
 S1 nerve block sensory deficit Nitta.png 422 × 480; 79 KB
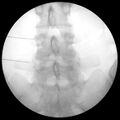
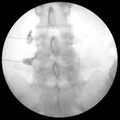
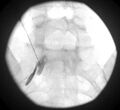 S1 transforaminal injection fluoroscopy.jpg 746 × 682; 88 KB
 SCJ Gray.png 600 × 327; 39 KB
 SCJ relations.jpg 750 × 297; 82 KB
 SCN MCN and ICN sensory supply.png 496 × 553; 336 KB
- SCN Pain Flexion.mp4 ; 1.96 MB
- SCN Pain Gait.mp4 ; 1.53 MB
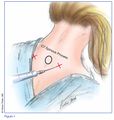
 SCN block.PNG 626 × 275; 327 KB
 SCN block2.PNG 618 × 571; 369 KB
 SEM.png 292 × 172; 4 KB
- SFN diagnostic criteria 2019.pdf ; 374 KB
- SIJ injection.mp4 ; 8.74 MB
 SIJ injection fluoroscopy.jpg 766 × 761; 141 KB
 SIJ innervation.png 285 × 444; 158 KB
- SIRVA - Wood 2022.pdf ; 1.05 MB
- SIS Emergency Protocols 2014.pdf ; 480 KB
 SI joint.png 450 × 321; 131 KB
 SNAP median nerve wrist and forearm.png 514 × 473; 71 KB
 SPACE BPI 2018.png 731 × 421; 25 KB
 SPACE BPI interference 2018.png 717 × 415; 25 KB
 Sacroiliac joint Gray.png 300 × 225; 103 KB
 Sacroiliac prolotherapy.jpg 327 × 291; 30 KB
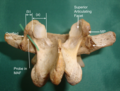
 Sacrum and Coccyx.jpg 1,186 × 530; 304 KB
 Sagittal T1 MRI of labral tear.jpg 258 × 294; 14 KB
 Sarcomere.gif 374 × 251; 9 KB
 Scalene trigger point.jpg 807 × 425; 56 KB
 Scaphoid.jpg 181 × 300; 13 KB
 Scapholunate angle DISI.jpeg 282 × 500; 22 KB
 Scapholunate angle VISI.jpeg 369 × 600; 31 KB
 Scapholunate angle normal.jpeg 300 × 551; 29 KB
 Schematic transverse section of spinal cord .png 741 × 451; 193 KB
 Scheuermann signs of lateral radiograph.jpg 600 × 768; 60 KB
 Sciatic nerve.jpeg 630 × 630; 61 KB
 Scoliosis L5 seating.jpg 2,388 × 1,795; 94 KB
 Screen Shot 2021-08-08 at 5.32.47 PM.png 322 × 336; 18 KB
 Screen Shot 2021-09-11 at 9.08.25 AM.png 215 × 157; 24 KB
 Screendem.png 429 × 1,080; 71 KB
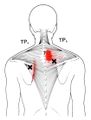
 Semispinalis Capitis, Multifidi Trigger Points.jpg 1,768 × 2,096; 101 KB
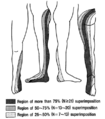
 Sensory-supply-of-the-lower-limb.png 399 × 599; 63 KB
- Sequence Variants - ACMG 2015.pdf ; 349 KB
 Severe Scheuermann disease photograph.jpg 248 × 485; 28 KB
 Shoulder.png 128 × 128; 5 KB
- Shoulder Pain - Brox 2003.pdf ; 306 KB
 Signpost.png 128 × 128; 3 KB
 Sinuvertebral nerve.png 1,333 × 1,292; 226 KB
 Sinuvertebral nerve chirogeek.jpg 525 × 400; 107 KB
 Slipman cervical dynatomes.jpg 811 × 1,161; 146 KB
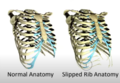 Slipped rib anatomy.png 607 × 419; 277 KB
 Sodium Bicarbonate.PNG 167 × 444; 44 KB
 Spainal cord sectional anatomy.png 1,200 × 880; 124 KB
 Spinal-cord.png 128 × 128; 7 KB
- Spinal cord - Tan 2022.pdf ; 6.24 MB
 Spinal cord motor pathways.png 1,080 × 720; 119 KB
 Spinal cord sensory pathways.png 1,200 × 720; 112 KB
 Spinal meninges.jpg 600 × 448; 73 KB
 Spinal nerves.jpg 912 × 506; 81 KB
 Spine.png 128 × 128; 5 KB
 Spine journal.jpg 480 × 639; 58 KB
 Splenius Capitis, Splenius Cervicis Trigger Points.jpg 1,830 × 966; 58 KB
 Splenius Capitis, Splenius Cervicis Trigger Points 2.jpg 1,544 × 1,044; 41 KB
- Spondyloarthritis - BPAC.pdf ; 1.31 MB
 Standard deviation.png 389 × 155; 4 KB
 Stanmore triangle SCJ.png 1,360 × 919; 153 KB
 Statistical Power.jpg 652 × 278; 18 KB
 Statistics.png 128 × 128; 5 KB
 Sternocleidomastoid Trigger Points.jpg 1,608 × 900; 124 KB
- Strazar2013.pdf ; 908 KB
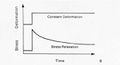 Stress relaxation.jpg 400 × 218; 11 KB
 Stretching.png 128 × 128; 7 KB
- Study Guide - L…naesthetics.doc ; 43 KB
 Subcostal nerve.jpeg 630 × 630; 48 KB
 Suboccipital Group Trigger Points.jpg 1,181 × 697; 123 KB
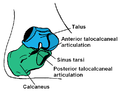 Subtalar joint anatomy basic.png 724 × 558; 24 KB
- Superficial bursitis - Khodaee 2017.pdf ; 2.92 MB
 Superior gluteal nerve.jpeg 630 × 630; 55 KB
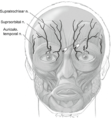 Supraorbital and supratrochlear nerve block.png 395 × 425; 105 KB
- Sweden+Exercise+booklet.pdf ; 950 KB
- Synov Membr Illustr.pdf ; 88 KB
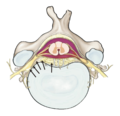
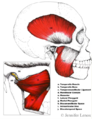 TMJ Anatomy.png 518 × 672; 377 KB
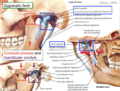 TMJ Anatomy2.png 622 × 474; 594 KB
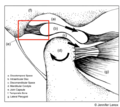 TMJ Anatomy3.png 612 × 547; 177 KB
- TMJ Closing MWM.mp4 ; 1.6 MB
 TMJ Injection.jpg 379 × 217; 32 KB
 TMJ Injection landmark.jpg 379 × 290; 64 KB
- TMJ Lateral Deviation MWM.mp4 ; 2.56 MB
- TMJ Opening MWM.mp4 ; 2.58 MB
 TMJ Self Mobilisation.PNG 559 × 270; 149 KB
 TMJ Splint.PNG 539 × 244; 201 KB
 TMJ mobilisation.png 972 × 676; 1.11 MB
 TMJ myofascial1.png 656 × 410; 650 KB
 TMJ myofascial2.png 656 × 604; 974 KB
 TMJ myofascial3.png 367 × 294; 270 KB
 TMJ retrodiscal space.PNG 695 × 332; 250 KB
 TMJ trigger point injections.PNG 551 × 285; 118 KB
 TablesVisualEditor.png 1,250 × 658; 64 KB
 TablesVisualEditor2.png 818 × 648; 63 KB
 TablesVisualEditor3.png 670 × 304; 80 KB
 TablesVisualEditor4.png 544 × 522; 19 KB
 TablesVisualEditor5.png 780 × 574; 47 KB
 Talar tilt.jpg 833 × 642; 104 KB
 Talking.png 128 × 128; 11 KB
 Team.png 128 × 128; 9 KB
 Tensor Fascia Lata.png 341 × 600; 202 KB
 Terry Thomas sign pre clench.jpeg 300 × 600; 29 KB
 Terry Thomas sign with clench.jpeg 300 × 600; 29 KB
 Test-svgrepo-com.svg 512 × 512; 3 KB
 Test-tube-svgrepo-com.svg 512 × 512; 2 KB
 Textbook.png 256 × 256; 7 KB
 The neuron.jpg 825 × 552; 50 KB
 Thoracic.png 128 × 128; 6 KB
 Thoracic ZA Joints.PNG 504 × 628; 25 KB
 Thoracic outlet syndrome compression.jpg 680 × 830; 87 KB
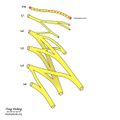
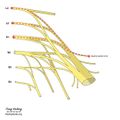
- Ting Wang 702 Notes 2022.pdf ; 3.7 MB
 Training.png 256 × 256; 21 KB
 Transverse-tarsal-joint.jpg 659 × 481; 30 KB
 Trapezius Trigger Points.png 647 × 1,241; 142 KB
 Trapezius Trigger Points 2.jpg 836 × 1,098; 62 KB
 Trapezius Trigger Points 3.jpg 471 × 636; 35 KB
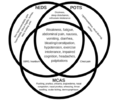 Triad heds pots mcas.PNG 571 × 478; 97 KB
 Triple compression.png 545 × 135; 146 KB
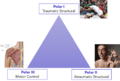
 Tripolar tension.png 708 × 372; 67 KB
- Twin Spine Study - Battie 2009.pdf ; 632 KB
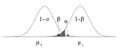
 Type I and type II statistical errors.jpg 800 × 240; 55 KB
 Types of Neurons.png 837 × 899; 73 KB
 Ulnar Elbow.jpg 1,067 × 899; 74 KB
 Ulnar Nerve US Probe.png 512 × 406; 400 KB
 Ultrasound Ulnar Nerve.png 409 × 307; 94 KB
 Upper limb muscles pain maps Feinsten.png 953 × 909; 147 KB
 Upper thoracic aperture.jpg 457 × 312; 30 KB
 User types.png 1,139 × 795; 19 KB
 Vertebral Arrangement Patterns.jpg 1,313 × 812; 69 KB
- Vertebrogenic Pain - Conger 2022.pdf ; 379 KB
 Vestibulospinal reflex.png 938 × 415; 134 KB


